Wednesday 28 January 2015

How I Crocheted my Slouchy Beanie in 5 Easy Steps..

I find myself strangely hooked to crocheting this season and i'm seriously doing nothing else. All my other craft ideas have to hang there in my mind till i'm over this crochet obsession of mine.


Today's post is all about slouchy beanies: Tutorial, Tips and Tricks on how you can get it done rightly.

The Slouchy beanie or cap you see here is unisex.


MEASUREMENTS:


For a perfect beanie perfect measurement is necessary.

Measurement for crown of a beanie: 7.5 inches for adult.

Lengthwise measurement for beanie: 9 inches.


MATERIALS REQUIRED:


1) Worsted weight yarn of two different colours
      I used Oswal teal green and Oswal jet black yarn
2) 1 thick crochet hook and 1 smaller hook.
      I used 9 mm and 4 mm hooks respectively.

SKILLS REQUIRED:


Double Crochet Stitch.
Single Crochet Stitch.
Half Double Crochet Stitch.

DIFFICULTY LEVEL:


Easy/Beginner

ABBREVIATIONS USED IN THIS TUTORIAL:


Dbl st=Double stitch.
Sn st=single stitch.
inc=increase.
dec=decrease.
Ch=chain

TUTORIAL:

STEP 1: INC ROUNDS.


Using thicker hook.
Rnd 1: Make magic ring. Ch 2. 11 Dbl st's in magic ring.(stitches including ch 2).
Rnd 2: ch 2. 2 Dbl st's in each stitch.(24 stitches).
Rnd 3: Ch 2. 2 Dbl st's in each stitch.(48 stitches).
Rnd 4: Ch 2. 3 Dbl st's. In 4th stitch make 2 dbl st's. Repeat.(56 stitches).
Rnd 5: Ch 2. 4 Dbl st's. In 5th stitch make 2 dbl st's. Repeat.(67 stitches).
Rnd 7: Ch 2. 6 Dbl st's. In 7th stitch make 2 dbl st's. Repeat.(76 stitches).
Rnd 8: Ch 2. 8 Dbl st's. In 9th stitch make 2 dbl st's. Repeat.(84 stitches).
Rnd 9: Ch 2. 20 Dbl st's. In 21st stitch make 2 dbl st's. Repeat.(88 stitches).

Tip:Measure the crown of your beanie, it should be 7-7.5 inches.
I'm specifying measurements in case some of you may want to use a differently weighted yarn whose stitches may not match to that of my own.

STEP 2: FIXING THE LENGTH.


Rnd 10-21: ch 2. Dbl st in each st(84 stitches).
Tip:By now the length of the beanie must be 8 inches. You can inc or dec rows accordingly to make it more or less slouchier.

STEP 3: DEC ROUNDS.


we have to decrease 10 stitches evenly so as to have a tighter circumference of the cap so that it will not fall off.
Tip:Average circumference of head:62-65 cms.

Rnd 22: Dec 4 stitches evenly. That makes it after every 20th stitch, dec 21st and 22nd stitch into one.(84 stitches)

STEP 4: CHANGE COLORS.


Rnd 23:Change color. I used half double crochet stitch for this round and decreased 6 stitches evenly. That makes it after every 14th stitch.(78 stitches).

Rnd 24: change color(green). make a round of Dbl st's.

STEP 5: BRIM


Using smaller hook.

Rnd 25-28: Change color(Black). Make sn st in each st.
Fasten off.

That's your beanie completed.

Why I used 2 hooks?
Bigger hook made my beanie soft,quickly and more flexible.
Smaller hook made the brim tighter so that it may not fall off.

I couldn't take more photos of this beanies it was taken from me as soon as I finished it.


Saturday 24 January 2015

DIY: Crochet Fingerless Gloves

Its too cold outside to let my pretty hands freeze, but i still want to use my phone, after all its internet addiction ;) Am i the only one who is addicted?

Hey, I'm Bella again with a new crochet project. The very easy, very cozy and very cute crochet fingerless gloves. You can see whole of the internet flooded with different designs and patterns used from ages by old and young BUT this is my version the thing!

Its lovely and i can use my phone too.


Alright pick up your hooks and begin.

MATERIALS REQUIRED:

Worst weighted yarn.
Crochet hook 4mm.
Beads.

SKILLS REQUIRED

Double Crochet.
Treble crochet.

DIFFICULTY LEVEL

Beginner.

ABBREVATIONS USED:

Rnd=Round.
ch=chain.
St=stitch.
Dbl st=double stitch.
Sn st=single stitch.
Trbl st=treble stitch.

TUTORIAL


Rnd 1: Beginning with a slip stitch chain 30. Now here the length of the chain vary greatly and depend completely on the width of your hand. If you have big hands then chain of 30 wont be ideal for you.
      How would i know how many stitches do i require?
         Simple as you have made a chain wrap it around your palm to see it fits and accordingly add or remove stitches.


Rnd 2: My chain is 30 stitches long. Ch 2[this makes the chain 32 stitches long] , Rev the direction, make first dbl st in 30th stitch of the chain.
Dbl St in each Stitch of the chain.

Rnd 3-6: Ch 2, Dbl st in hole of the below dbl st and not in the chain itself. This will create a different texture.


THUMB
Rnd 7: Ch 12, [not 2, we are going to make some space for thumb.] Again check for your size.
Join the end of this chain to the other end of the 6th row making a circle.
Ch 2 and start dbl crocheting as before.

Note: When joining the 2 ends of a circle use the chain and not the hole to make invisible seam.


Rnd 8-9: Ch 2, dbl st in each hole.

Rnd 10-12: Ch 2, dbl st in each hole and dec 6 sts evenly.


Rnd 13-14: ch 2, dbl st in each hole.

Sew the free ends of the palm that are yet to be sewed.
And make around of single st over the circumference of the thumb.


TRIM
Rnd 15: Take a different color yarn, join it to the gloves where you finished off the round 14 and ch 2.
In same stitch make 3 trbl st and 1 dbl st. making overall 5 stitches in same stitch including ch 2 at the beginning. Thus makes a semicircle.
Next st: make 1 sn st.

In next stitch you dont chain 2 but make a dbl st first
i.e 1 dbl st, 3 trbl sts, 1 dbl st[ in same stitch].
Continue the process for whole of the circumference of the gloves.


Rnd 16: Make a round of chain stitch joining the tops of all the semicircles.


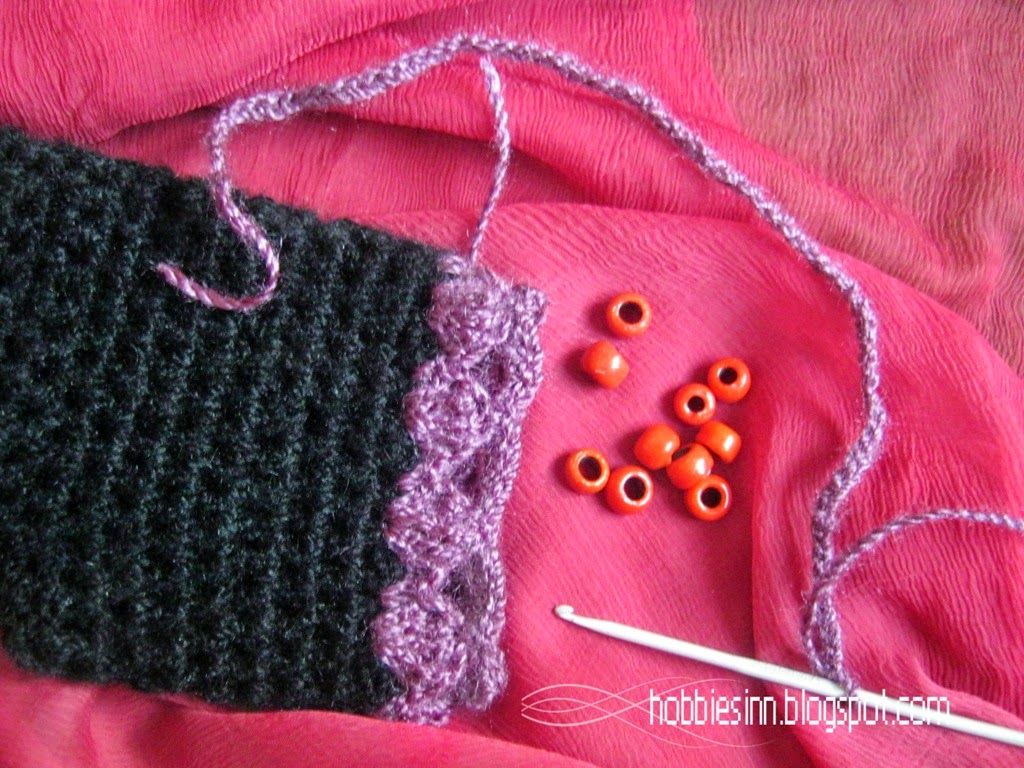
ADDING BEADS:
Either make a long chain or take a strand of yarn pull through the top of each semicircle and add bead after each semicircle. See the picture below.
join the ends.


There are other ways to add beads but i choose this one for this very pattern.

 Seems lot of work? well it is not.


FLOWER:
The flower used in this pattern is called puff flower.

I find myself wearing it all the time.
For any queries comment below.
Please Share and Subscribe for more :)

Tuesday 20 January 2015

DIY: Spike Stitch Crochet bellies.

Hey there its time for the Tuesday tutorial and again I'm with a unique bellies pattern. It happens to be the most easiest and the simplest of all.
My next blog posts will be featuring a unisex slouchy beanie on which I'm working now and a cute finger less gloves that I'm already done with.

According to me crochet bellies are good for beginners in crocheting to get hold of things. Really.


SKILLS REQUIRED

Double stitch.
Spike Stitch.
Single Crochet.

DIFFICULTY LEVEL

Beginner.

MATERIALS REQUIRED

Your favourite coloured yarn. I used Galaxy green and a dull veridian green in this pattern.
Crochet hook. Size II.

ABBREVATIONS USED:

Ch=chain.
Dbl st=Double Stitch.
Sn st=Single stitch.
Inc=increment.
Slp st=slip stitch


TUTORIAL:

  Note: I've made a double stitch in each hole of the preceding stitch and not in the stitch itself, This creates a different texture than the original double crochet stitch.
*No of stitches may vary depending upon the foot size.


Rnd 1: Slp St, Ch 5, join [This makes your magic circle].
Rnd 2: Ch 2, Dbl st 11, join (makes 12 Stitches).
Rnd 3: Ch 2, 2 Dbl st's in each stitch below  (24 Stitches).
Rnd 4: Ch 2, Dbl st in each stitch, inc 1 (25 stitches).
Rnd 5: Ch 2, Dbl st in each stitch, inc 1 (26 stitches).
Rnd 6: Ch 2, Dbl st in each stitch, inc 1 (27 stitches).
Rnd 7: Ch 2, Dbl st in each stitch, inc 1 (28 stitches).
Rnd 8: Ch 2, Dbl st in each stitch, inc 1 (29 stitches).
Rnd 9: Ch 2, Dbl st in each stitch, inc 1 (30 stitches).
Rnd 10: Ch 2, Dbl st in each stitch, inc 1 (31 stitches).
Rnd 11: Ch 2, Dbl st in each stitch, inc 1 (32 stitches).
Rnd 12: Ch 2, Dbl st in each stitch, inc 1 (33 stitches).

Rnd 13: Ch 2, Dbl st in each stitch upto 20 stitches leaving the rest. i.e 13 stitches.
Rnd 14: Ch 2, reverse the stitching direction, Dbl st in each stitch(20 stitches).
Rnd 15-29: Ch 2, reverse the stitching direction, Dbl st in each stitch(20 stitches).

Fold the ends and sew.

RIM:
Take a separate color yarn.
Rnd 1: Join the yarn to the slipper in the back,
            ch 2, 
            Dbl st in each st upto 6 stitches, 
            Make a spike, Repeat 6 times.(30 stitches).
Rnd 2: Dbl st in each stitch.(30 stitches).
Rnd 3: Sn st in each stitch(30 stitches).

How to make a spike?
Step1:

To make a spike stitch it is important to have atleast 3 rows of either single crochets or double crochets to work the spike.
We start from the 4th row.

1. Make 6 single crochet stitches.

2. Skip 1 stitch and put stitch marker in the next stitch.

3. The skipped stitch i.e. the 7th stitch is the center of the spike stitch.

4. Count over 2 stitches over right and 1 row down. i.e. under the 5th single crochet stitch just made.

5. With yarn over your hook, insert hook in the marked stitch (2 st's right and 1 row down). Wrap yarn over hook and pull through. You will have 3 loops on the hook.

6. Now count 1 stitch over right and 2 rows down, i.e. under 6th single crochet stitch.

7. With yarn over your hook, insert hook in the marked stitch (1 st right and 2 rows down). Wrap yarn over hook and pull through. You will have 5 loops on the hook.

8. The third spike is worked straight 3 rows down. Directly under the skipped stitch.

9.  With yarn over your hook, insert hook in the stitch that is straight 3 rows down. Wrap yarn over hook and pull through. You will have 7 loops on the hook. That is 3 spikes done. Now 2 more are left.

10.We move to the left now. Count 1 stitch towards left from center of the spike and 2 down.

11. With yarn over your hook, insert hook in the marked stitch (1 st left and 2 rows down). Wrap yarn over hook and pull through. You will have 9 loops on the hook.

12. Count 2 to the left from center of the spike and 1 row down.

13. With yarn over your hook, insert hook in the marked stitch (2 st's left and 1 row down). Wrap yarn over hook and pull through. You will have 11 loops on the hook.

14. Yarn over and pull through all the loops.

15. Chain 1 to close the stitch.

16. Work your next single crochet into the first marked stitch of the row.

17. Make another one after 6 single crochets.

18. You can increase or decrease the number of spikes as per your wish.

Refer to picture for reference.


I made spikes around the crocheted bellies. Don't they look cool?


I hope you enjoyed my post.
Happy crocheting :)


Saturday 17 January 2015

DIY : I Love You Crochet Slippers

I'm back again with my new design of crochet bellies. A combination of Black and green giving your heels a new style ;) This one is not complemented with any flower or a bow but rather a cute green fish button. I called it I Love you slipper because of the button. It says I love you. The cutest button it is.

Skills Required:

Half double Crochet.
Single crochet

Difficulty level:
Novice.


To make this beautiful pattern follow this Tutorial. Change the yarn color after you are done with the cap and at the heels. 
I have used nylon yarn in this one, it is much thinner than the cotton yarn and hence requires 2 strands of the yarn to be crocheted together. 


Half double crochet falls between single and double crochet in height. if you know one of these you will pick this stitch quiet easily. Here is how you can do it. A very informative guide to get you started with half double crochet and other basics.


I hope you liked this pattern and make it for your self or a cute gift for someone you love.
If you made a similar one I would like to see it too.
Comment me your suggestions and queries if any.

Happy crocheting :)

Monday 12 January 2015

Multi Crochet Slipper

Crochet slippers are trending in lately and I seem to have fallen in love with these. I come up with a new design daily. Comfy and good looking slippers are must have for anyone as they go well with any outfit u wear. The color combo i used for this one are quiet trendy that you might like as well.
Simple to make for even a beginner.

Watch my video for the instructions to make one for your self.


In this post I'm showing you how to change color in crocheting.

>We are using double crochet stitch in this one.
>Do the double crochet stitch till last two loops are on the hook.
>Take a different colored yarn and pull it through both the loops.
>Continue you work with the new colored yarn.
>Refer picture for reference.


I hope that you like this design. Feel free to ask any question and I will be there to answer your queries.
Bye.


Sunday 11 January 2015

Yellow Flower crochet slippers

Hey there this is my new pattern for a wonderful crochet slippers. I used neon blue and bright yellow yarn for this combination and result was way too pretty than I thought.


Required skills :

Half double crochet stitch,
Double crochet

Steps:

Round 1: Crochet a magic ring.
Round 2: Crochet 10 half double crochet stitches.
Round 3: Make 2 Half double crochet stitches in each stitch. You will have 20 stitches here.
Round 4: Make 1 Half double crochet stitch in one stitch and 2 half double crochet stitches in next. Total stitches at this pint will be 30.
Round 5 to 10: Make 1 half double crochet stitch in each stitch.
Round 11: Crochet 20 Half double crochet stitches.
Round 12 to 28: Crochet 20 half double crochet stitches in each stitch.

Fold and sew the ends.

Now take a yellow yarn and make a rim of double crochet stitch with it.
Take back the blue yarn and make 2 rows of half double crochet stitches with it.

Decorate with  puff flower.


So what are you waiting for grab a crochet hook and yarn and start making these beautiful slippers, I would be very glad to see yours too.
These make a very good gift as well :)

Thank you for stopping by.

You can also watch the video tutorial to make such a slipper here.

Friday 9 January 2015

The Vintage Aura Crochet Slipper


Winter time means crochet time. I love making crocheted slippers, gloves and scarves during winters mostly for friends and family. Its winter already and they all want one, I ain't selling them any. These are just handmade gifts from me :)


I think I should make a unique design for each and every slipper I make although they follow the same basic pattern:the easiest one :D Yes! the most easiest one.

Today I'm bringing to you my latest slipper pattern - The vintage aura crochet slipper. I named it so because it gives be some vintage feel. That's me though.

In this post I'm going to share my flower and leaf pattern and if you want to get to the slipper pattern follow this tutorial here.

1. Flower:

This flower has six petals and is one of the basics. I'm assuming that you can crochet and if you don't you can check my post for beginners guide to crocheting.

1. Make a magic ring.
2. Round 1: Make 12 double crochet stitches in it.
3. Round 2: chain 1, Make 4 double crochet stitches in the next stitch.
    Make a single crochet stitch in the next one. Repeat for the entire row till you have 6 petals.
4. Fasten off.


2. Leaf:

This leaf includes all stitches of heights between slip stitch to treble crochet stitch.
Treble crochet stitch works just like the double crochet stitch. You just have to wrap the yarn over the hook twice instead of one and pull through 2 loops at a time.

1. Chain 6.
2. Skip the first stitch and make a slip stitch in the next one.
3. Make the single crochet stitch in the next. Thus increasing the height a bit.
4. Make a half double crochet stitch in the next and double crochet in the next one.
5. Now make the treble crochet stitch in the next one. This is the highest stitch in a row.
6. In the last stitch make 5 double crochet stitches. This makes the base of the leaf.
7. Now the other half of the leaf works in a reverse fashion. First the tallest stitch and than the smaller ones.
8. Make a treble crochet first and than double crochet stitch and than half double in the next stitches.
9. Make a single crochet followed by slip stitch.
10. I the last stitch make another slip stitch.
11. Lastly chain 1 and fasten off.


These are very warm and cozy.

Try this cute design for your upcoming slippers and flaunt ;) This is easy to follow by a beginner.


I will be back soon with few more patterns to follow. 
Till then 
Happy crocheting.

Wednesday 7 January 2015

Paint your own LadyBird

A free time is a blessing and I'm having plenty of it nowadays. crafting around seems the best i can do most of the time and its fun too. Painting stones and pebbles make good craft and is fun to do.
I choose to paint some stones for the garden decor.


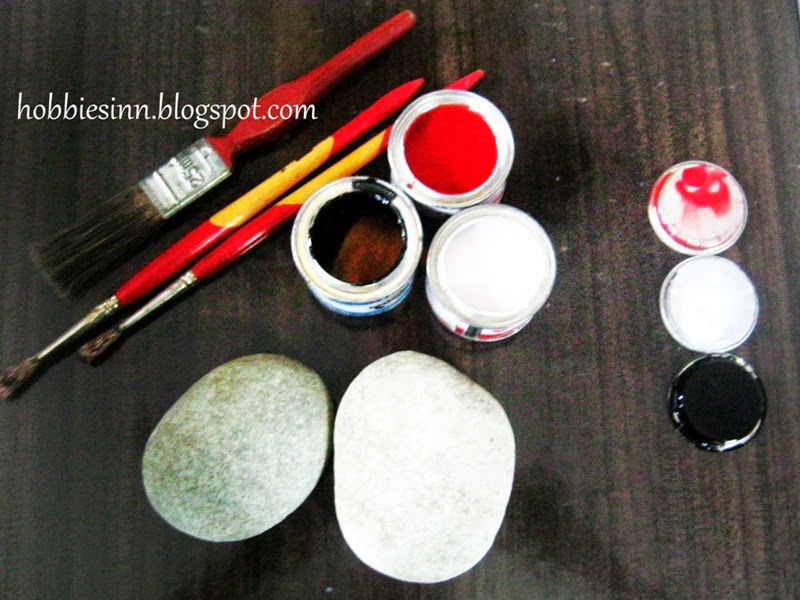
THINGS REQUIRED:

Synthetic enamel(paints)
Stones
Painting brushes
Kerosene

WHAT DID I DO?

I choose a round stone about the size of my palm and start painting it like this. simple as that ;)
Let it get dry.
Place in pots or in flowerbeds.
They look great.

You can paint other insects too and decorate your flowerbeds.


I enjoyed this and so will you. This activity can be undertaken by kids too( if you have any), letting them paint their favourite insects and placing them over the garden :)

Share this activity with your friends and family.
Let the love spread.

Monday 5 January 2015

The making of chilly pakodas

Its the most wonderful time of the year, chilly outside and comfy insides :) And in this serenity what can be more better idea of having snacks than the very chilly pakodas from Indian kitchen. I'm going to share the most easiest snacks recipe in this very blog post.

I like them hot and I hope my readers too will enjoy the flavors. :)

Beware if you are not too fond of green and red chillies. ;)

Difficulty level : Too easy.

Ingredients:

1) 1 cup Gram flour
2) 1/2 cup Water
3) Few Green Chillies
4) 1/2 tspn Red Chillies
5) 1 Medium Onion
6)  Salt to taste
7) oil

Method:

   Making of pakodas

1) Slice Onion , and chop the green chilies. Keep oil to get hot.

Hobbiesinn.blogspot.com

Hobbiesinn.blogspot.com


2) Add water to the gram flour and mix well. you will have a mixture of thin consistency.

Hobbiesinn.blogspot.com


3) Add Green chilies, onion and salt.

4) Mix well.

Hobbiesinn.blogspot.com
                                      

5) With the help of a tablespoon pour the mixture in the hot oil and start frying.

6) Fry till light brown.

     How to make onion chutney.

1) Take some chopped onion,

2) Add red chilly and salt.

3) Mix well. and your onion chutney is ready.

4) You can add peppers and green chilies if you like it more spicy. 

Hobbiesinn.blogspot.com
Serve hot.
:)
Hobbiesinn.blogspot.com