Tuesday, 7 March 2017

10 Reasons Why You Should Give Handmade Gifts

Do you have a handmade gift that you treasure? Are you always lost whenever it comes to gifting your friends and family? Do you want to put in a little more love in your gifts? We thought it would be fun to put together the reasons why you should consider giving handmade this year.


1. The person who has everything.

Don't we all have that "hard to shop for" person in our lives. They buy pretty much anything they want to and you remain hanging there wondering what to give them as gift. Well isn't handmade the one that will touch the heart? Remember giving a gift is more about emotions and feelings than what money can buy.

2. You determine the quality.

Well, you are making it so you control the quality.

3. Personalization.

You can create your own personalized gifts in so many different ways by including favorite colors, quotes, patterns..... endless possibilities.

4. Unexpected.

Handmade gifts bring joys, laughter, tears, jaw-dropping expressions and beautiful memories. Isn't the surprise factor worth it.

5. Unique/One of a kind.

Well for your unique people, unique handmade gifts are totally in. Sometimes its good to have something that only you can have, nobody else has it. And that is one thing ladies always shop for-one of a kind thing.

6. Less expensive.

In many cases giving a handmade is less expensive than puchasing a gift. When you purchase something you are usually paying for the time it takes to make them. If you eliminate the time factor than giving out the handmade is much soft on your pocket.

7. Thoughtful.

A handmade bag, a handmade necklace, a painting all need to have been given a thought. It is a great feeling to feel that someone actually  took the time and effort to decide and make something for you. Something that will touch your heart.

8. Do what you love.

Creating something can be therapeutic and so relaxing. It can be a stress buster. Moreover it is an excuse to get away with your busy schedule to do something you love.

9. Gift they will treasure.

Do we even need to explain this. A handmade gift is someones love and you will always remember it and treasure it.

10. Share your talents.

We all are talented in some ways and finishing a creative project gives such sense of accomplishment, right? Seeing someone wear it, use it, display it can give greater satisfaction.

If you know of some other reasons and have some gorgeous handmade gift ideas than share with us.
Subscribe and share.

Bye.

Sunday, 5 March 2017

My Spring Inspired cushion

I did this pattern on one cold winter afternoon. I saved it, to share it in spring. I have put some beautiful pink blossoms and some fabric bird applique to decorate it with. It gives such warm and happy vibes. And it looks perfect on my favorite sofa.

Its so easy that even a novice can do.


Materials:

In this pattern I'm using 3 ply cotton yarn in colors sky-blue, baby-pink, mustard, leaf-green and deep-chocolate and cream-white.
Crochet hook of size 9 made of stainless steel.
Fabric bird applique.
Stuffing.
Fabric for back side.
Tapestry needle and thread.

Size:

This pillow is an exact square of size 12 X 12 inches.

Steps:


I chose sky-blue for the base.

Round 1: Chain 63. Start from the 4th stitch from the hook and make a row of plain double crochets. You must have total stitch count of 60.

Note: If you don't know how to crochet you can easily learn it from here. It includes most important stitches for a beginner.

Round 2 - 60: Chain 3. 1 double crochet stitch in each stitch.

The border: Change the color of the yarn to cream-white.

Make a border of single crochets all around.
At the corners make 5 single crochets in each hole.

Branch: Take a deep-chocolate color yarn and using a tapestry needle make a chain stitch on two edges of the blue patch in form of  a branch.

Flowers and leaves: I have already compiled a post regarding the flowers and the leaf in one of my slipper patterns-Click here to get to it.

Birds: To make the little mustard flowers watch this video here.

Just like me you too can use a little colorful bird applique to compliment the cushion.
I have done a separate post to show how it is done step wise.

The back of the pillow:

Either crochet another patch of blue or use a fabric of your choice.
Stitch it (whatever is your choice) to your patch from 3 and half sides. Stuff it. And after all the stuffing is done Sew the remaining half of the 4th side of your pillow to complete it.


Update: If you want to increase the size of the cushion than add the number of stitches in the initial chain. The number of stitches depend upon the size you want to take.
Also you must increase the number of rows too to the number of stitches.

e.g. If you increased the number of stitches in chain to 70 i.e. 10 more than what we have made, than you must also increase the number of rows to 70 instead of keeping that to 60. This will ensure you have a perfect square.

Moreover the size of cushion will depend upon the thickness and type of yarn and hook used. This pattern will remain same of all types, although number of stitches may vary. 

I hope you enjoyed reading this post. Subscribe, share and keep crocheting.


Saturday, 4 March 2017

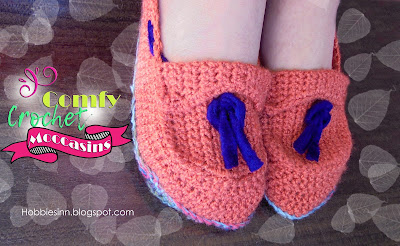
Comfy Crochet Moccasins

Finally this shoe pattern is done and I can't believe i'm writing it at last and sharing with my beautiful readers.


So grab your crochet supplies and work rounds and rounds of crochet stitches with me.

Materials Required:

Crochet Hook( size 9 )
8 ply Nylon Yarn
Cotton Yarn
Tapestry needle
Ribbon

Level:

Intermediate

This shoes is made in 3 parts.
1. Sole.
2. Body.
3. Upper Patch.

We will begin with the sole.

> Sole:

I have already made a tutorial for the crochet sole pattern that can be used in any slipper pattern with sole.

> Body:


Steps:

Round 1: Don't start from top but just few stitches below where the toe begins (probably 10 or more). Start with single crochet and stitch through the front portion of the sole, do so for 49 stitches so that you reach the area where ankle area begins. (refer to picture below)

Make next 5 stitches in half double crochet and after that continue in double crochet for 24 stitches.
Make next 5 stitches again in half double crochet and continue with single crochet stitches till you reach the end. Join with the first stitch.

Lets recapitulate: We begin with 49 single crochet stitches, 5 half double, 24 double, 5 half double and 9 to 13 single crochets to complete the row.


Round 2 and 3 : 49 half double crochet stitches. 34 double crochet stitches. 9 to 13 half double crochet stitches. Join.

Round 4: 5 single crochets. 2 decrements.
In toe area, 2 single crochet, 1 decrease (* repeat 5 times).
2 decrements, single crochet up to 49th stitch.
5 half double, 24 double, 5 half double and 9 to 13 single crochets to complete the row.

Round 5: 39 half double crochets, 2 decrements. 24 double crochets, 2 decrements. Join to complete the row.


We make decrements and use different height stitches (in same row) so as to make the shoe comfy and snug. It also gives shoe a required shape.

> Upper Patch:


This is done in single crochet only.

Round 1: Chain 19.
Round 2: Single crochet in each stitch.
Round 3: Skip first stitch work from next stitch. Increment 1 in last stitch.
Round 4: Work from the first stitch in all stitches.
Round 5: Skip first stitch work from next stitch. Increment 1 in last stitch.
Round 6 to 9: Repeat steps of round 4 and 5 till 9th row.

Round 10: Skip first stitch work from next stitch. Increment 1 in last stitch.
Round 11: Work from the first stitch in all stitches.
Round 12 to 18: Repeat steps of round 10 and 11 till 18th row.

Make a row of single crochet on all sides to make them even.

Join the upper patch to the body of the shoe using tapestry needle and yarn end. Fold the upper patch from the side with two ends and join at the edges.

Joining the string or laces:

Take the lace or string you want to use and insert it through the holes of crochet stitches of the body, taking the ends out from the upper patch right in the center. Make a knot.


Wear it, Flaunt it.


Easy slipper soles

World is flooded with the design inspirations for the slipper or shoes you could make and most of them are required to have a separate sole. This post is about one such easy slipper sole that can be done in crocheting. You can work any kind of slipper on these crochet soles and adjust stitches according to your yarn type and hook size.


If you are good at knitting, a simple garter stitch patch like this would also do.

Materials Required:

Crochet Hook( size 9 )
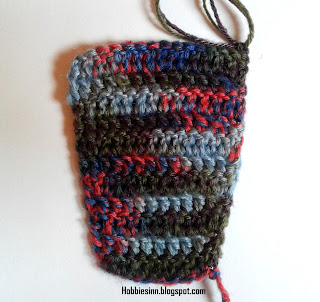
8 ply Nylon Yarn. (I'm using 2 strands of yarn to make sole thicker and stiffer.)

Level:

Beginner.

Steps:


Round 1: Chain 11, skip the first two stitches and begin from the 3rd one from the hook. start double crochet and you must have 9 stitches by the end of round 1.

Round 2: Chain 2, Make 9 double crochet stitches over the previous round of 9 stitches.

Round 3: Chain 2, make 4 double crochets and in 5th stitch increment one stitch. Continue in double crochet for the rest of the row. (total stitches =10)

Round 4: Chain 2, Double crochet in each stitch.

Round 5: Chain 2, Make one increment in the first stitch and the last stitch of the row. (total stitches= 12)


Round 6 - 10: Chain 2, double crochet in each stitch. (stitch count will remain 12)

Round 11: Chain 2, make 6 double crochets and in 7th stitch increment one stitch. Continue in double crochet for the rest of the row. (total stitches =13)

Round 12: Chain 2, Double crochet in each stitch.

Round 13: Chain 2, Make one increment in the first stitch and the last stitch of the row. (total stitches= 15)


Round 14 - 24: Chain 2, double crochet in each stitch. (stitch count will remain 15)

Round 25: Chain 2, Make one decrement in first and last stitch of the row. (total stitches=13)


Round 26: Chain 2, Make one decrement in first and last stitch of the row. (total stitches=11)

Round 27: Make a row of single crochet stitch all around the patch to smooth out the edges.

Fasten off and weave in the end.