
Its too cold outside to let my pretty hands freeze, but i still want to use my phone, after all its internet addiction ;) Am i the only one who is addicted?
Hey, I'm Bella again with a new crochet project. The very easy, very cozy and very cute crochet fingerless gloves. You can see whole of the internet flooded with different designs and patterns used from ages by old and young BUT this is my version the thing!
Its lovely and i can use my phone too.

Alright pick up your hooks and begin.
Crochet hook 4mm.
Beads.
Treble crochet.
ch=chain.
St=stitch.
Dbl st=double stitch.
Sn st=single stitch.
Trbl st=treble stitch.
Rnd 1: Beginning with a slip stitch chain 30. Now here the length of the chain vary greatly and depend completely on the width of your hand. If you have big hands then chain of 30 wont be ideal for you.
How would i know how many stitches do i require?
Simple as you have made a chain wrap it around your palm to see it fits and accordingly add or remove stitches.

Rnd 2: My chain is 30 stitches long. Ch 2[this makes the chain 32 stitches long] , Rev the direction, make first dbl st in 30th stitch of the chain.
Dbl St in each Stitch of the chain.
Rnd 3-6: Ch 2, Dbl st in hole of the below dbl st and not in the chain itself. This will create a different texture.

THUMB
Rnd 7: Ch 12, [not 2, we are going to make some space for thumb.] Again check for your size.
Join the end of this chain to the other end of the 6th row making a circle.
Ch 2 and start dbl crocheting as before.
Note: When joining the 2 ends of a circle use the chain and not the hole to make invisible seam.

Rnd 8-9: Ch 2, dbl st in each hole.
Rnd 10-12: Ch 2, dbl st in each hole and dec 6 sts evenly.

Rnd 13-14: ch 2, dbl st in each hole.
Sew the free ends of the palm that are yet to be sewed.
And make around of single st over the circumference of the thumb.

TRIM
Rnd 15: Take a different color yarn, join it to the gloves where you finished off the round 14 and ch 2.
In same stitch make 3 trbl st and 1 dbl st. making overall 5 stitches in same stitch including ch 2 at the beginning. Thus makes a semicircle.
Next st: make 1 sn st.
In next stitch you dont chain 2 but make a dbl st first
i.e 1 dbl st, 3 trbl sts, 1 dbl st[ in same stitch].
Continue the process for whole of the circumference of the gloves.

Rnd 16: Make a round of chain stitch joining the tops of all the semicircles.

ADDING BEADS:
Either make a long chain or take a strand of yarn pull through the top of each semicircle and add bead after each semicircle. See the picture below.
join the ends.
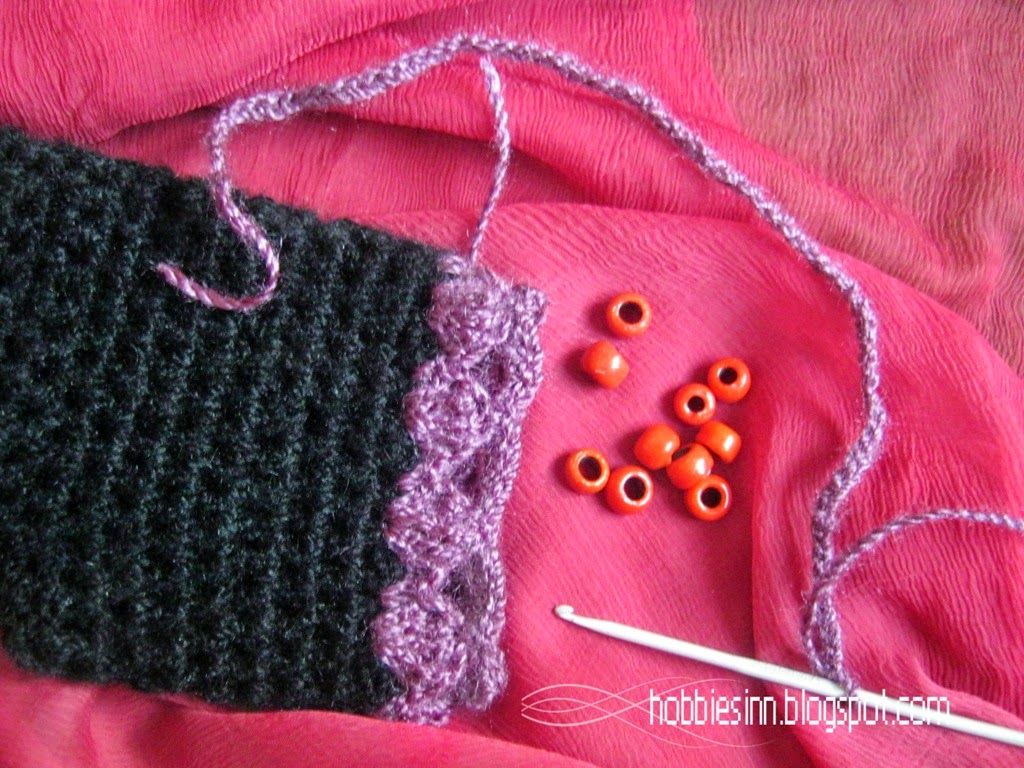
There are other ways to add beads but i choose this one for this very pattern.
Seems lot of work? well it is not.

FLOWER:
The flower used in this pattern is called puff flower.
I find myself wearing it all the time.
For any queries comment below.
Please Share and Subscribe for more :)
Hey, I'm Bella again with a new crochet project. The very easy, very cozy and very cute crochet fingerless gloves. You can see whole of the internet flooded with different designs and patterns used from ages by old and young BUT this is my version the thing!
Its lovely and i can use my phone too.
Alright pick up your hooks and begin.
MATERIALS REQUIRED:
Worst weighted yarn.Crochet hook 4mm.
Beads.
SKILLS REQUIRED
Double Crochet.Treble crochet.
DIFFICULTY LEVEL
Beginner.ABBREVATIONS USED:
Rnd=Round.ch=chain.
St=stitch.
Dbl st=double stitch.
Sn st=single stitch.
Trbl st=treble stitch.
TUTORIAL
Rnd 1: Beginning with a slip stitch chain 30. Now here the length of the chain vary greatly and depend completely on the width of your hand. If you have big hands then chain of 30 wont be ideal for you.
How would i know how many stitches do i require?
Simple as you have made a chain wrap it around your palm to see it fits and accordingly add or remove stitches.
Rnd 2: My chain is 30 stitches long. Ch 2[this makes the chain 32 stitches long] , Rev the direction, make first dbl st in 30th stitch of the chain.
Dbl St in each Stitch of the chain.
Rnd 3-6: Ch 2, Dbl st in hole of the below dbl st and not in the chain itself. This will create a different texture.
THUMB
Rnd 7: Ch 12, [not 2, we are going to make some space for thumb.] Again check for your size.
Join the end of this chain to the other end of the 6th row making a circle.
Ch 2 and start dbl crocheting as before.
Note: When joining the 2 ends of a circle use the chain and not the hole to make invisible seam.
Rnd 8-9: Ch 2, dbl st in each hole.
Rnd 10-12: Ch 2, dbl st in each hole and dec 6 sts evenly.
Rnd 13-14: ch 2, dbl st in each hole.
Sew the free ends of the palm that are yet to be sewed.
And make around of single st over the circumference of the thumb.
TRIM
Rnd 15: Take a different color yarn, join it to the gloves where you finished off the round 14 and ch 2.
In same stitch make 3 trbl st and 1 dbl st. making overall 5 stitches in same stitch including ch 2 at the beginning. Thus makes a semicircle.
Next st: make 1 sn st.
In next stitch you dont chain 2 but make a dbl st first
i.e 1 dbl st, 3 trbl sts, 1 dbl st[ in same stitch].
Continue the process for whole of the circumference of the gloves.
Rnd 16: Make a round of chain stitch joining the tops of all the semicircles.
ADDING BEADS:
Either make a long chain or take a strand of yarn pull through the top of each semicircle and add bead after each semicircle. See the picture below.
join the ends.
There are other ways to add beads but i choose this one for this very pattern.
Seems lot of work? well it is not.
FLOWER:
The flower used in this pattern is called puff flower.
I find myself wearing it all the time.
For any queries comment below.
Please Share and Subscribe for more :)


